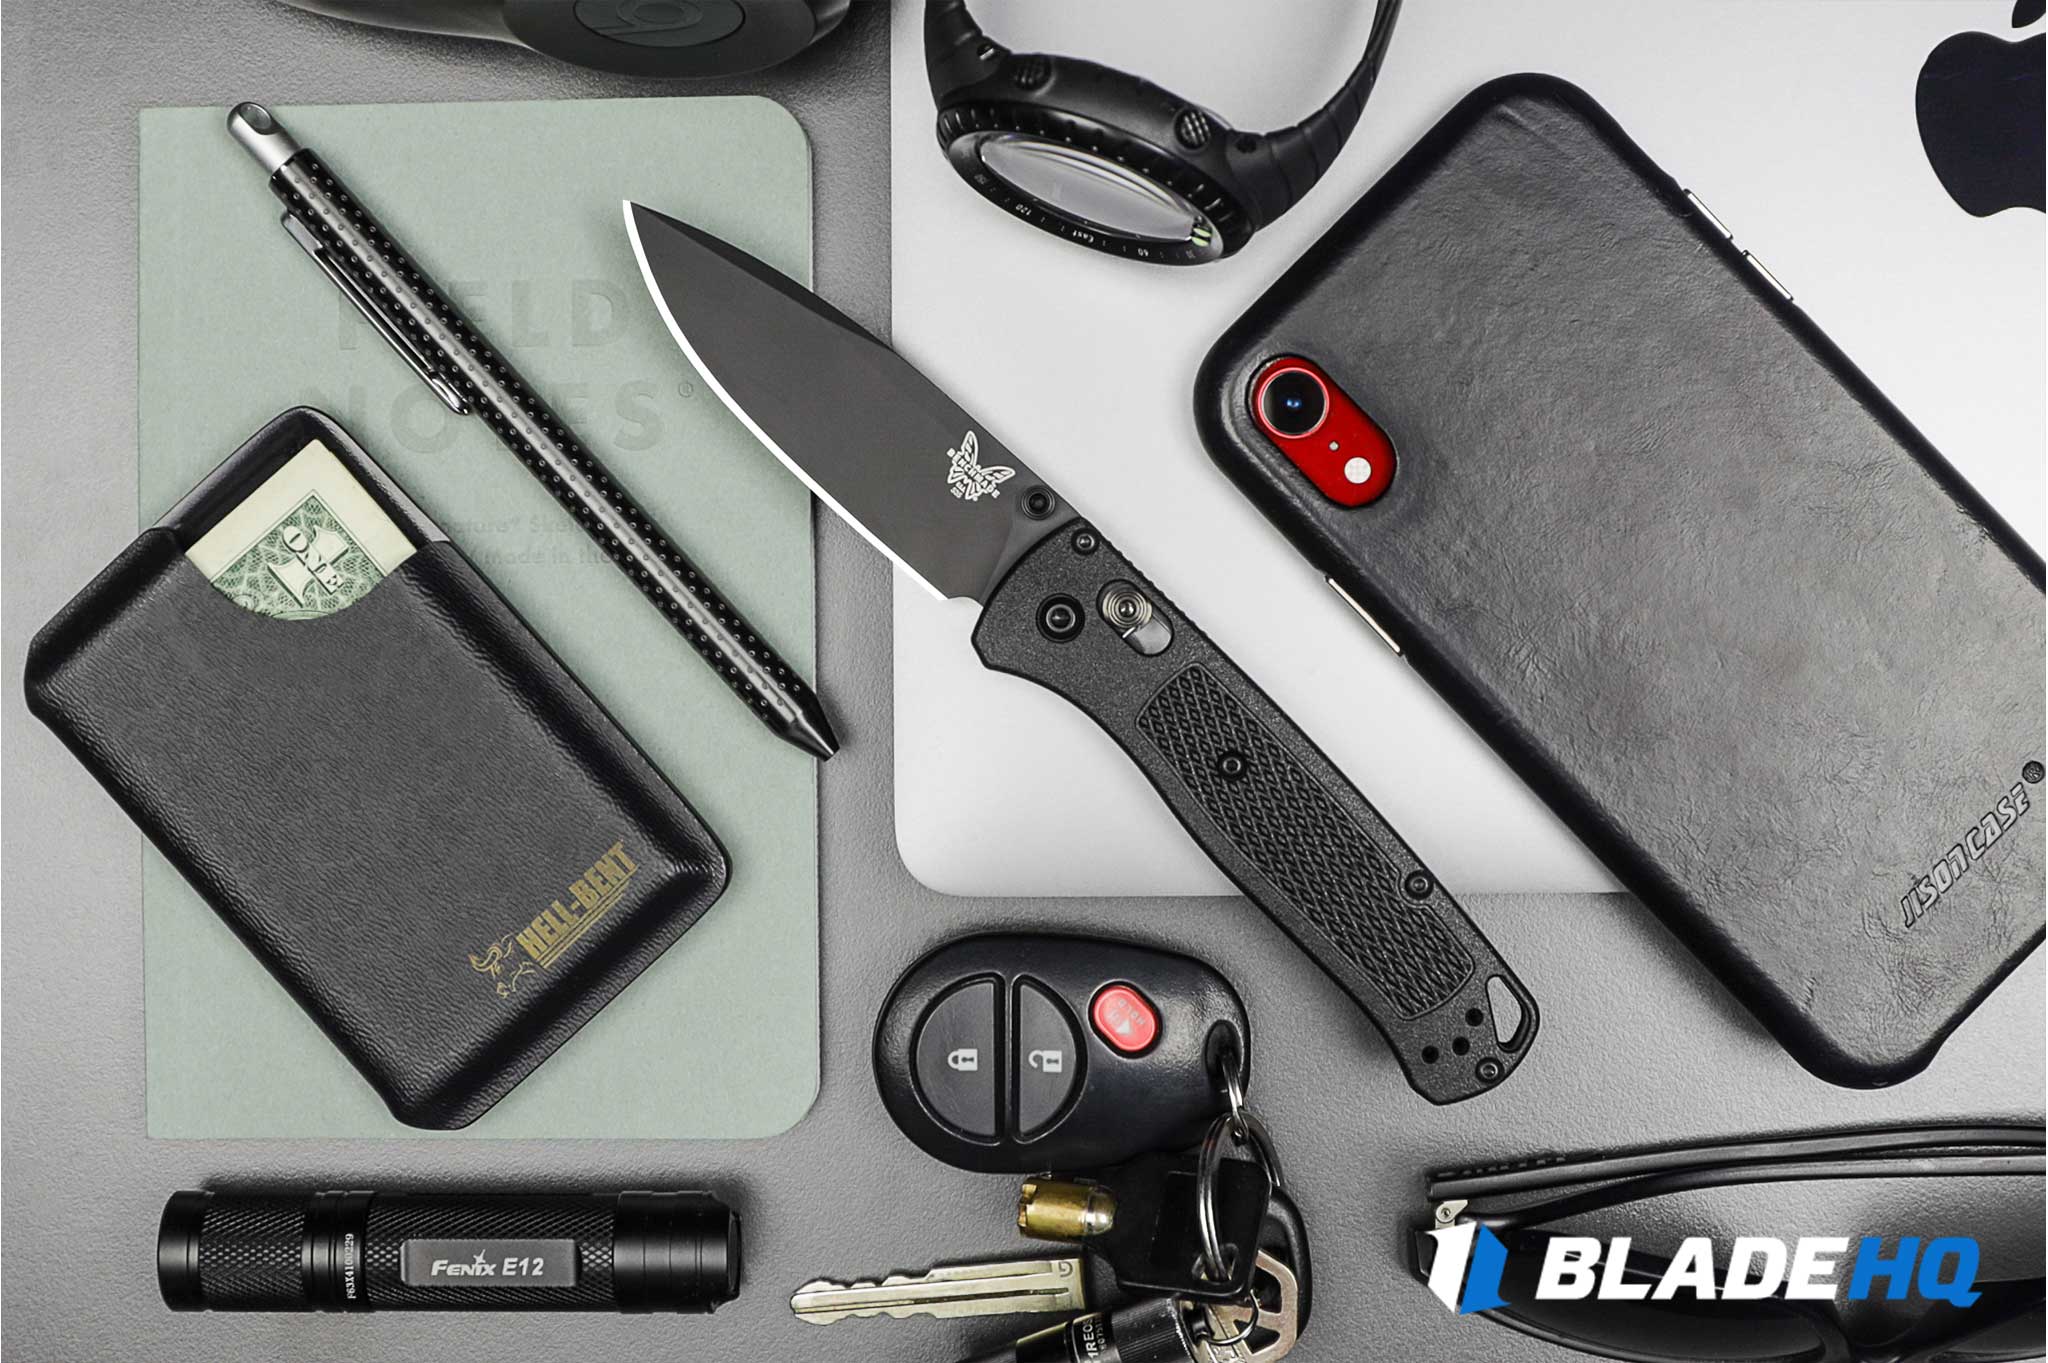
A long time ago, my friend Trevor wrote a blog post entitled “9 Ways to Carry a Fixed Blade.” It was a great blog post, but in the years since he wrote it, the fixed blade world has become a whole lot bigger. I found eleven more fixed blade carry methods, none of which are gimmicks. Each of these excels in one area or another, and you should choose carefully which is best for your next fixed blade knife.

I will model many of these carry styles in pictures, and most require a belt. These pictures will quickly make it apparent that I need to lose a few pounds in the paunch and a few inches in the beltline. I’m aware of this, so please go easy on me!
A word about Sheaths
The most significant determining factor of how you can carry your knife is its sheath. As a rule of thumb, leather sheaths are made for a specific carry style, while polymer and canvas sheaths are more modular. I’ll explain in each section what sheaths for that style of carry most often look like. Alright! Let’s get into it!
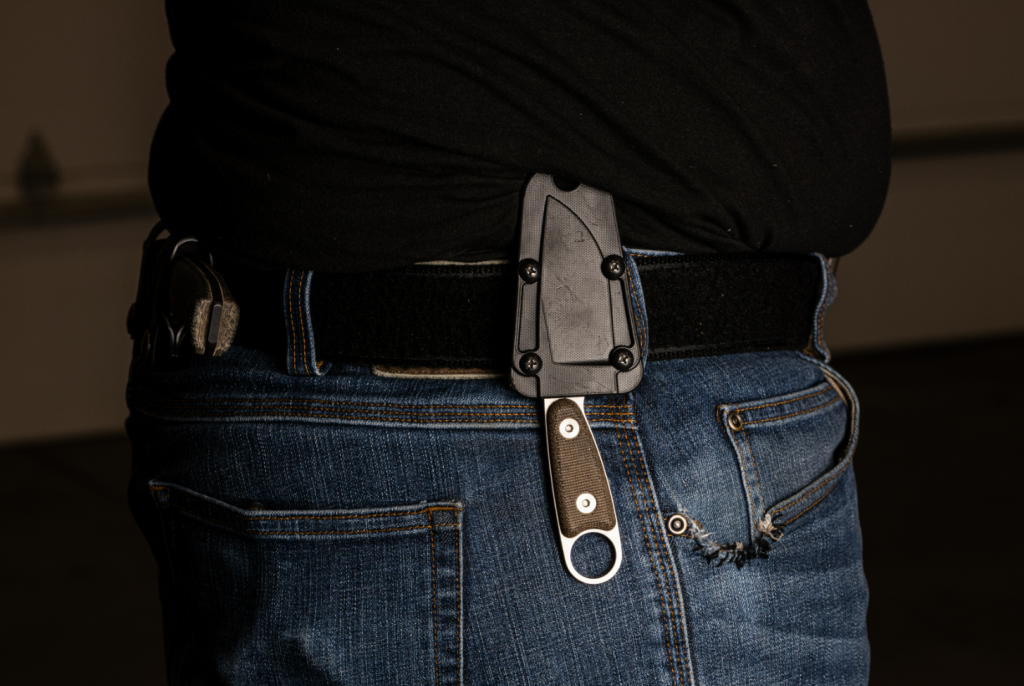
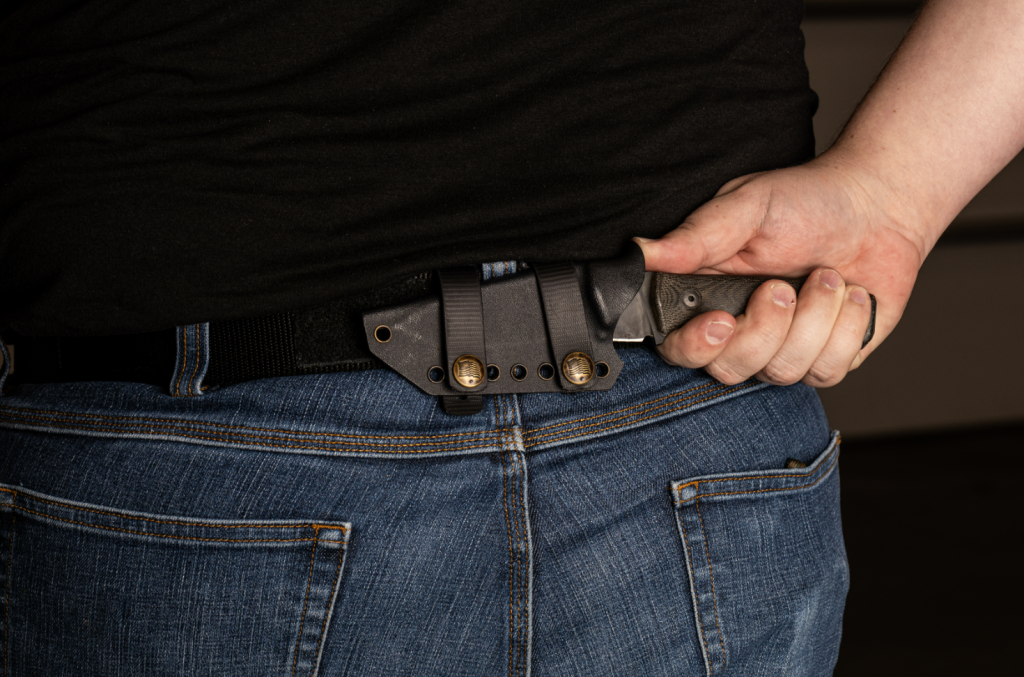
Standard Belt

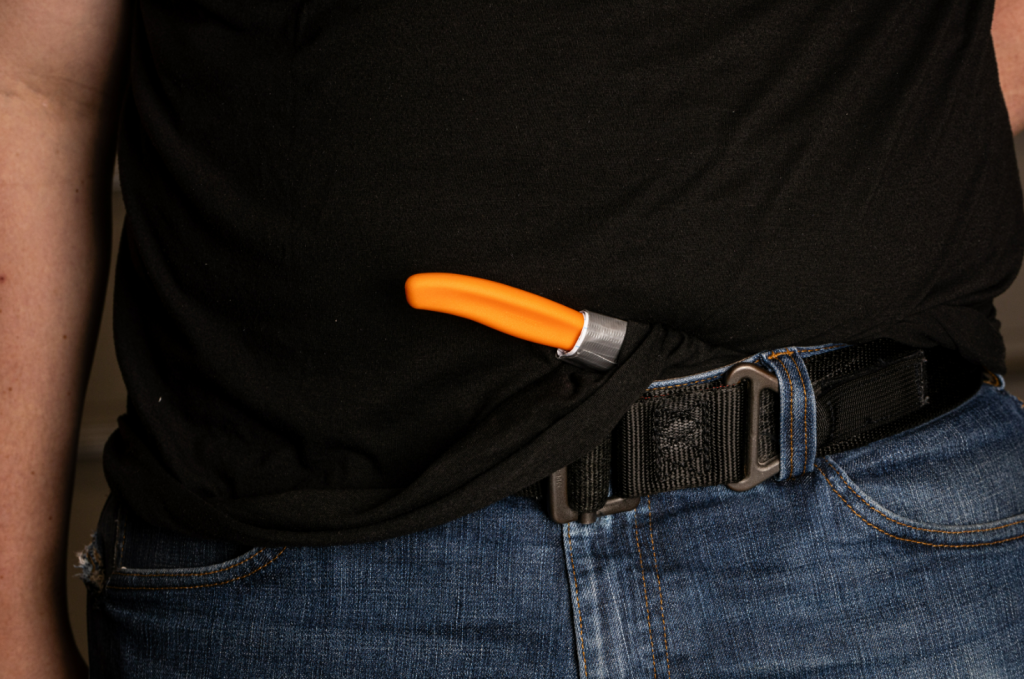
This is the most common way to carry a fixed blade. The sheath sits vertically on the belt, and the knife slides down into it. Gravity helps keep the knife in the sheath, so retention isn’t as much of an issue. If you’re using your fixed blade every day, this is a solid option. It’s easy to get the knife in and out. This type of carry is best for small to medium-sized knives, and is a favorite of forest workers, hikers, and EDCers. They love it because it keeps their knives close at hand, while keeping them high and tight enough to keep them from snagging on stuff.
This carry style is very versatile, but it has its limitations. It is not the fastest way to get to your knife, and it often sits behind your midaxillary line (more on why that matters later), so it might not be the best for a self-defense knife. Carrying your fixed blade like this also pushes the handle fairly high on your torso, so if the knife is too big, it can prod you in the ribs. That high seat means you often have to lift your shirt to get to the knife, which is EXTREMELY LAME when it’s cold outside.
For what it’s worth, when I took stock of my fixed blade collection, I found that about half of my knives are set up for standard belt carry. Apparently I like this style a lot! I always thought scout carry was my favorite, but my knives don’t lie…
Tip-Up
This is much like the standard belt carry, however the knife is upside-down. This means that gravity is working against you, so any sheath without a rigid body and either a snap fit or secondary retention isn’t an option. This is a rare way to carry a knife, but some people use it. I tried it, and I found that my knife kept poking the chair I was sitting on (by the way, good luck drawing the knife while seated). It even unbuckled me once while I was driving, that was fun. This style of carry is only good for very small knives. Big knives both prod you in the ribs with the blade and harass your surroundings with the handle.
I found that this carry style excels in two situations: when the knife is worn under a hip belt on a backpack, and when it’s worn under a big coat. Both make drawing your knife upward very difficult, so drawing downward is an easy alternative. Other than that, in my opinion, you’d be better served by tip-down orientation.
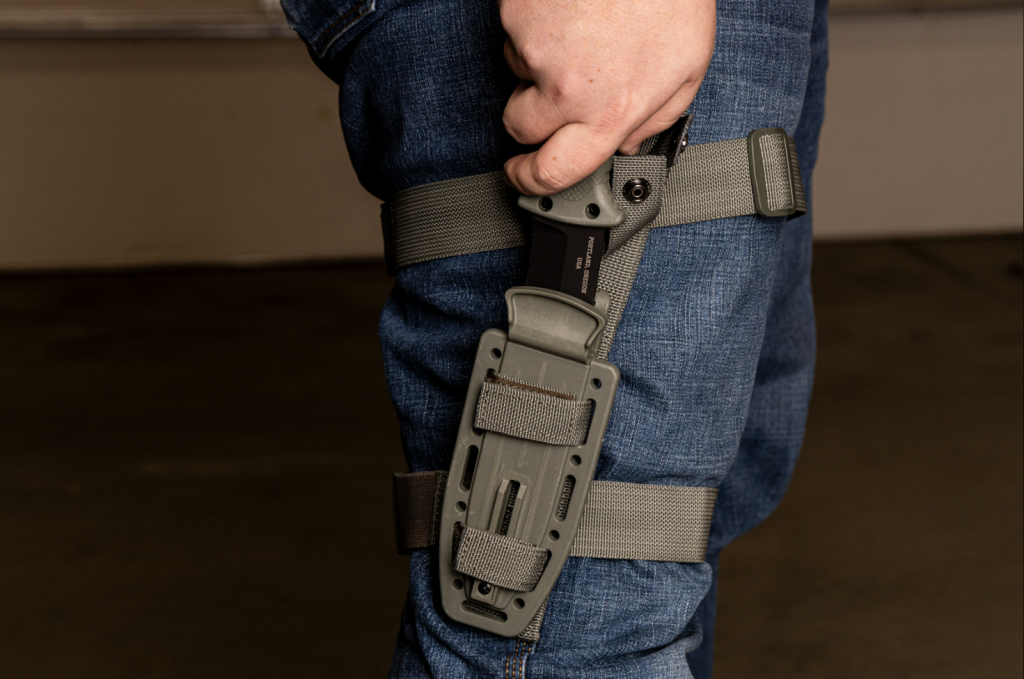
Drop-Leg
If you have a bigger knife, drop leg can be a great option to make the knife more comfortable to carry and easy to draw. Instead of mounting the belt loop in the middle of the sheath, drop-leg extends a tongue of either nylon or leather to mount the loop at the base of the handle. This “drops” the knife down your “leg.” I love it when a name comes together!
The drop-leg is much like the standard belt carry, but it trades ease of carry for ease of access. It’s way easier to draw the knife, but it tends to snag on stuff more. You see these sheaths on medium to large fixed blades. The sheath is more likely to snag on stuff, but people don’t often take these knives on hikes. You see them more around camp, the garden, and on survival knives.
Dangler

If you want even EASIER access to your knife, and you don’t mind it snagging on EVERYTHING, this is the carry method for you. Make no mistake, your knife is full-on dangling with this carry style. That means that if you’re kneeling, crouching, sitting, etc. the sheath will hang as low as it possibly can. This makes accessing your knife very easy, but it makes the knife snag more than any other style of carry.
You see these a lot on bushcraft knives. Bushcrafters like to stay in one area and create all kinds of crazy stuff with natural resources. They don’t hike much, so they rarely encounter things to snag the knife on. Another feature is it puts the blade much lower, and therefore increases the range of motion for long blades, which is why swords use danglers, too.
Leg Strap
This one is built on either a drop-leg or dangler setup. Instead of just letting the knife hang, the user will tie a strap or some cordage around his/her leg. This makes the knife easy to draw from a standing position, as the cord pulls against the sheath while drawing.
If you like drop legs or danglers but you also like to hike, this might be for you. It really helps the knife not snag on things. I genuinely do enjoy using leg straps, but I always feel extremely nerdy while wearing one. That’s worth mentioning.
Some knives take it a step further and use two leg straps to attach the blade instead of a leg strap and a belt loop. This is the preferred method for scuba divers who don’t have a belt and wear skin-tight wetsuits. It’s secure, and it makes the knife easy to reach.
Cross-Draw
This carry style is much like the other belt-carry styles, but it positions the knife on the weak side and forces the user to draw it across his or her body. This is great for a number of situations. If you carry a firearm on your strong side, the weak side is a logical place to put a knife. This also lets you reverse draw with your weak hand in a scuffle, which is always nice! Just make sure you’re trained, licensed, justified, etc. Don’t do anything stupid.
Cross-draw is also perfect if you have a very long blade, like a machete or a sword. After a certain length (for me it’s about an 8-inch blade), strong-side drawing becomes very difficult. Your arm is only so long, and to draw it strong-side, you have a torso and armpit to fuss with. But to draw it cross-draw, you get the entire width and length of your torso and the ability to reach forward as you draw the blade. Much easier!
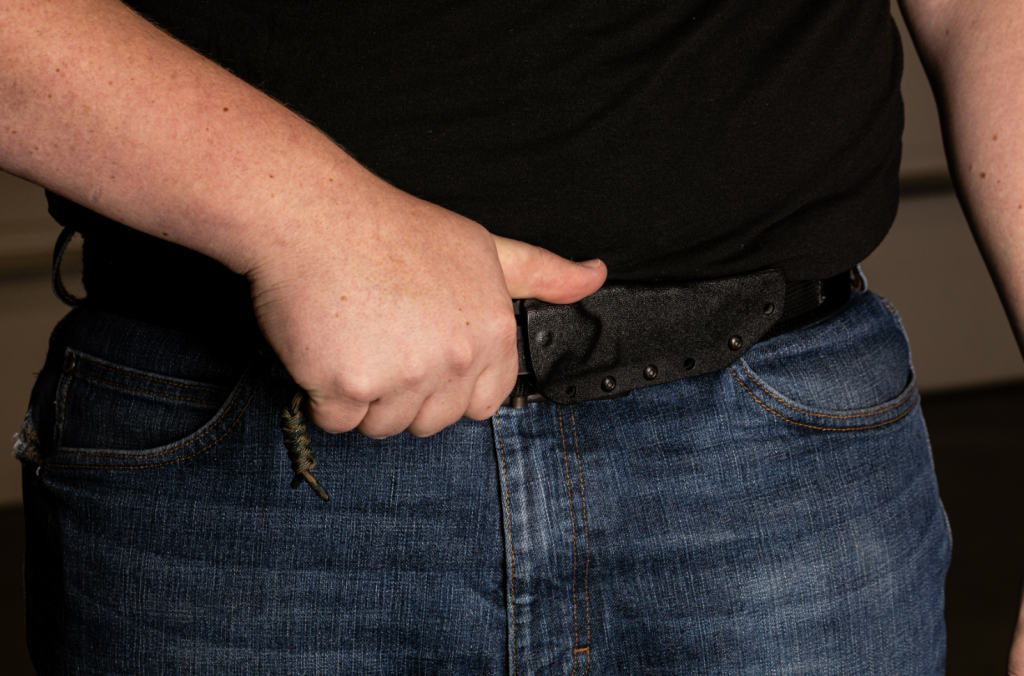
IWB
Inside-the-waistband carry, or IWB, is the preferred way to conceal a knife. It makes it harder to draw, harder to sheath, less comfortable to carry, and can lead to some awkward questions if you print the wrong way, but the knife is fully concealed. I only recommend this if, for whatever reason, you don’t want the world to know you’re carrying a knife, like you’re a body guard, police officer, or a well-trained citizen.
If you are one of these, you probably also conceal a firearm, and the same rules of concealment apply here. Bigger and longer is harder to conceal, so play your cards carefully! It may take some trial and error to find the perfect balance for you, but when you figure it out, IWB can be a sustainable way to carry your defensive blade.
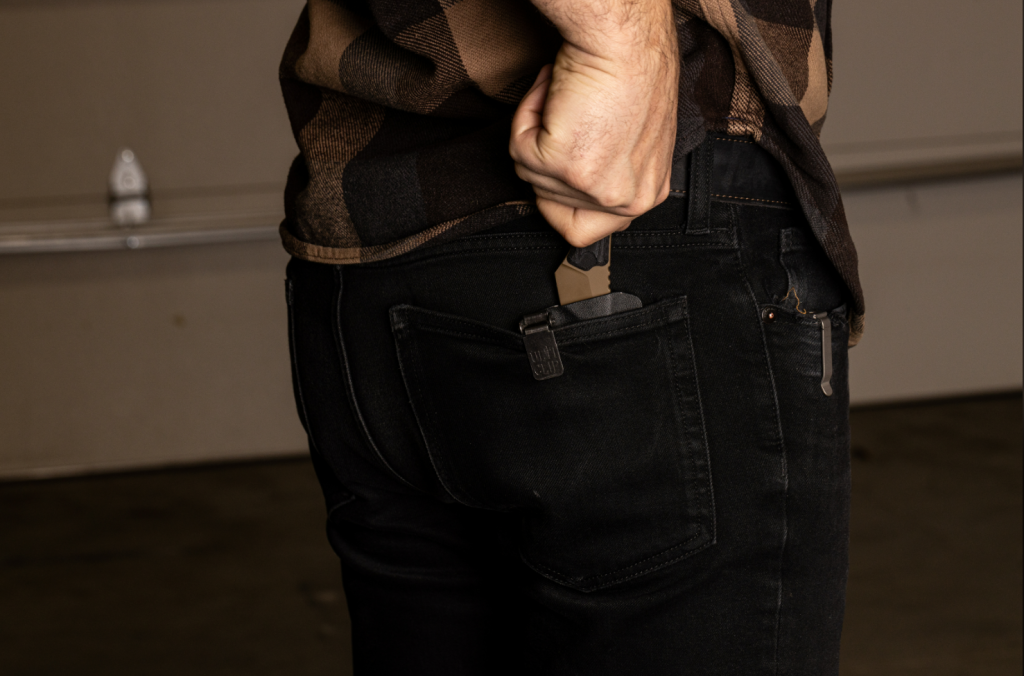
Scout
This is our first horizontal carry option. For scout carry, the sheath rests at the base of the spine along the beltline. This tucks the blade out of the way, so it doesn’t snag nearly as much on stuff. Just make sure your knife is shorter than you are wide, or that snagging will quickly remind you of its existence. This style is easy to draw from, but can take a bit of practice to get good at resheathing. Scout carry is easy to conceal, and my goodness do I feel cool when I remember it’s there.
But here’s the downside. This summer I was camping with a church group, and one of my buddies needed a knife. Without asking, he just reached for the handle and yanked it, and the knife was in his control. It wasn’t a problem and nobody got hurt, but imagine if you were in a fight. If, for any reason, your hands were busy with something else, that knife could become your enemy in record time. Edged combat, self-defense, and martial arts expert Patrick Odle came to Blade HQ to teach us about self-defense knives, and through a myriad of demonstrations on balance, grappling, wrestling, etc., he showed us just how dangerous scout carry can be in a self-defense scenario.
Moral of the story: Carry scout style around camp, but NEVER carry it anywhere you are even remotely likely to end up in a fight. As a side note, the same goes for handguns.
Cant

Whether carried at the small of the back, on the hip, or elsewhere, this carry style involves the knife being stored at an angle. This is a matter of preference. If you naturally want to draw the knife at an angle, the cant might just be for you. Depending on where you carry it, it can increase or decrease your ability to conceal the knife, if that matters to you.
It’s worth mentioning that this carry style is a rarity on stock knives. Most knives are set up for vertical or horizontal carry out of the box. If someone is carrying their knife on a cant, that sheath is probably a custom job.
Appendix
This carry style orients the knife horizontally in front of you, just off to the dominant side. It makes it easy to grab the knife from just about any position, but there are two important things to consider. First, this can be uncomfortable when seated if the knife and sheath combo is too large. Second, the longer the blade, the more uncomfortable questions you may have to answer.
This is a favorite of hikers and EDCers because of its ease of carry and access, all while being easy to resheath as well.
Cross-Draw Appendix
Take Appendix carry, and make it a bit more tactical. People who go for this like that the handle of the blade is centered with their body, making it easy to draw with either hand, either for a utility or defensive role. Other than that, it brings with it all the upsides and downsides of appendix carry!
Another perk of having it in front of you is that you is that it positions the knife in a favorable position for self-defense. Your body has three lines that divide it – your midaxillary line is a line that cuts you into a front half and a back half, your sagittal plane that cuts you into an upper half and a lower half, and your midline that cuts you into a right half and a left half. Where these lines intersect is your center of gravity, and straying too far from that center makes it harder to stay balanced and in control. If you reach for a knife just behind your hip, or heaven forbid behind your back, you are moving your center of gravity behind your center of mass, and that makes you vulnerable. But having that knife right in front of you, and being able to draw it with both hands, will be a huge boon if the situation gets hairy.
Vertical appendix

This method is most common for small defensive knives, and they often sit next to a firearm. Military and police trainers are always trying to perfect their draw, technique, responses to incoming attacks, etc., and they have found that this position works well for quick, controlled, and safe deployment.
This carry style does not work for me, however, because I am, well, too fat. And even if I wasn’t I can’t imagine it would be especially comfortable. Just like concealing a firearm, it’s a sacrifice of comfort for security. If you’re prepared to make that sacrifice, pick this style!
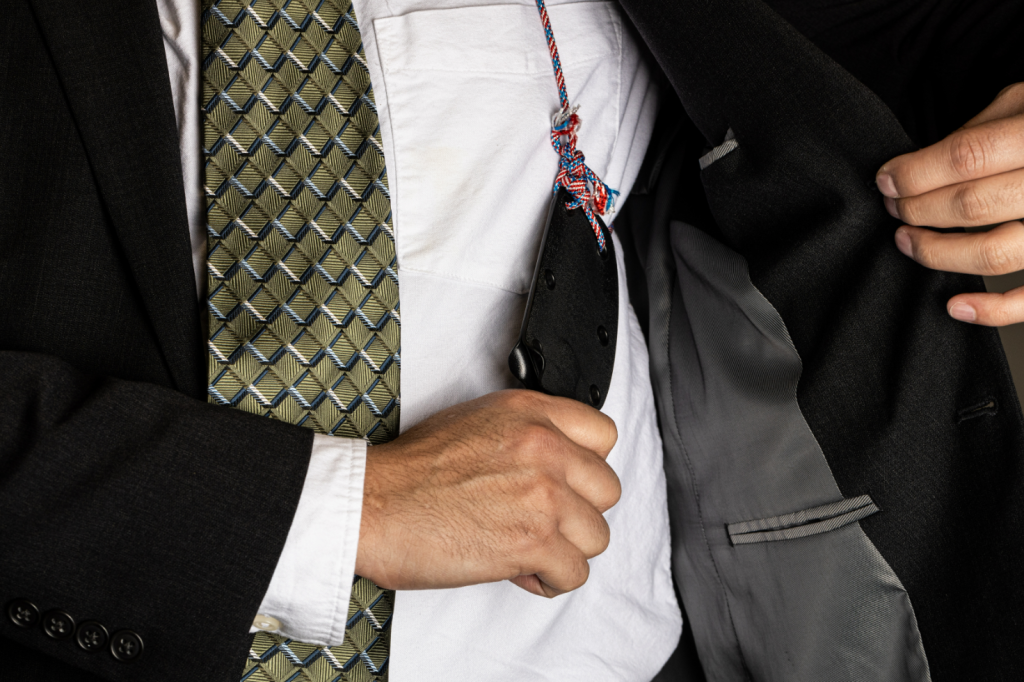
Static Line
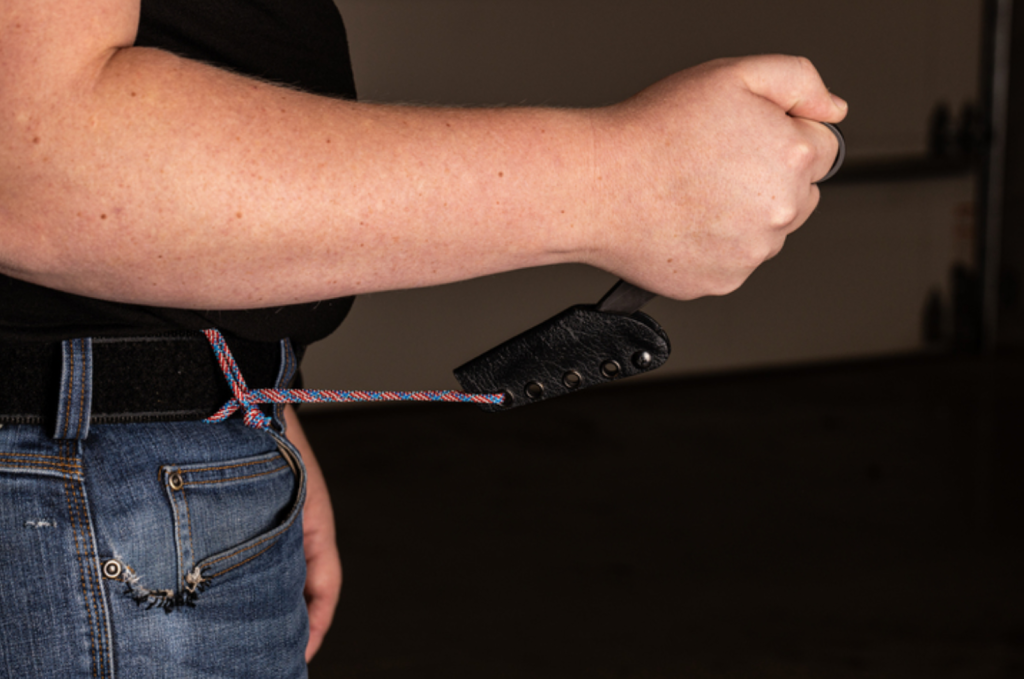
This is another form of IWB, but it’s quite a bit more comfortable. Instead of relying on a clip to detain the knife, you just let it sit, tucked in. This makes the cross-section much smaller. To make sure the knife never runs away on you, it’s tethered by a cord. That also makes drawing the knife super easy; just yank the knife, and the knife comes while the sheath stays.
This is great for concealing the knife, and it makes a great choice for an EDC fixed blade. It’s easy to set up, easy and relatively comfortable to carry, and gives you a useful piece of cordage on the top!
Neck
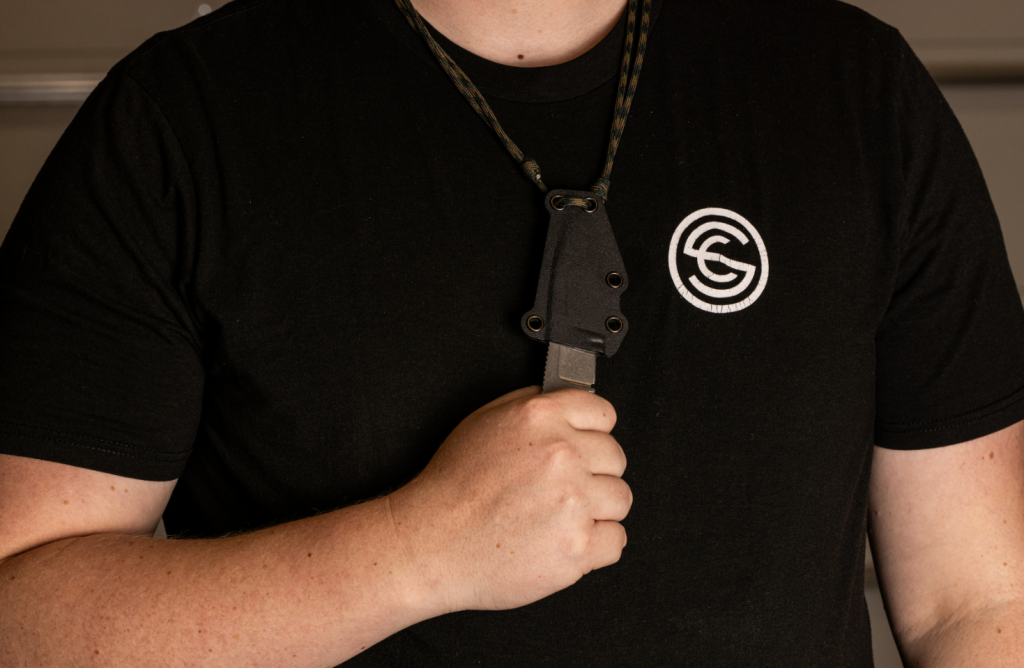
This is simply wearing your knife like a necklace. It makes the knife easy to grab, and in the right outfit it can look cool. You see it only on small knives; big knives weigh you down and get in the way. I like to carry a neck knife, but I don’t often get to because my wife stands 4’9”, and when she hugs me, her face lands perfectly where my knife sits. I love knives, but I love her even more, and her hugs are worth enough to me to find a different way to carry my knife.
If you have a normal-sized significant other, your mileage may vary. But make no mistake – the convenience of a neck knife is real. It also makes for a great conversation starter around the campfire! Some people are concerned about others grabbing at their neck knife, but don’t worry. If you’re worried, just tuck it under your shirt. If someone grabs it there, you have bigger problems!
Harness
You ever see a detective with one of those sweet shoulder harnesses that hold a gun? Well, with a bit of paracord or leather, you can make one for your knife. And just like the detective’s holster, it is a great way to keep the knife close at hand and concealed under a jacket.
If you play your cards right with this kind of setup, you can do some cool things. Some women will use some clever stitching and clips to make their bras into this kind of holster. Some use it to carry multiple knives, a knife and a gun, or some other crazy combo. This is the place to let your imagination run wild!
Strap

This one is perfect for backpackers and hikers – simply attach your knife sheath to the strap of a backpack. That way, no matter what the trail throws at you, you’ve got a knife. Need to cut through a vine? Extricate yourself from a thorny tree? Whittle a stick while waiting for the tram? Just grab your knife. The downside is that while you’re not wearing a backpack, you don’t have your knife. And you should ALWAYS have a knife!
Boot

Carrying a knife in your boot is about the coolest thing you can do. Ladies, carrying a knife in those tall riding boots you bust out every fall is really cool. Trust me, I’m an authority on what is cool, straight bussin’ no cap lit, fam. (Or whatever the cool kids are saying these days).
The choice to make with boot carry is whether to carry inside or outside the boot. Inside doesn’t snag, outside doesn’t chafe. Just make sure it’s small and light enough that it doesn’t make walking difficult.
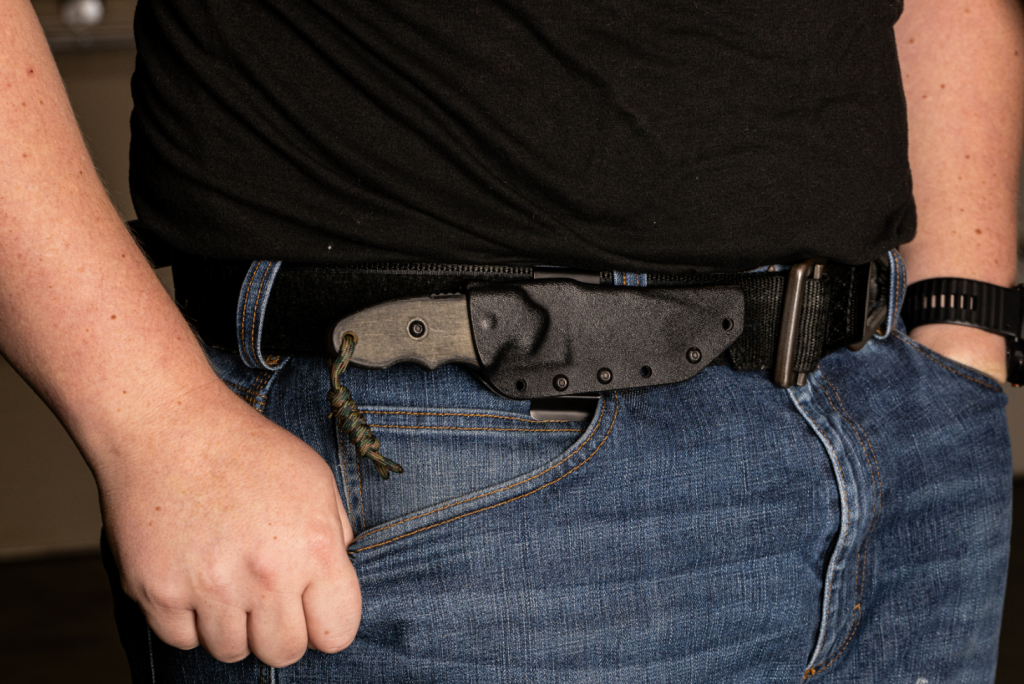
In-Pocket
This is, in my opinion, the best way to carry a knife for everyday tasks. You take a small knife and mount its sheath inside your pocket right where a folder would naturally go. You have all the access of a folder, but all the strength of a fixed blade. Just know that this will occupy most of your pocket!
I also notice that when it’s hot outside, I tend to sweat under the sheath more, so I carry my in-pocket fixies during the winter. Other than that, I have no beef. This is probably my favorite way to carry a fixed blade!
Shirt Tuck
If you have a knife without a sheath, this is the method for you. It was popularized by edged combat expert Ed Calderon, who learned it from his mother. To defend herself, she’d wrap a standard paring knife in paper and tape, roll it twice in the seam of her shirt, and tuck the whole thing into her waistline. As it turns out, this is a great way to have a fixed blade knife handy at a moment’s notice!
If you’re travelling and can’t fly with a knife, just stop by the grocery store wherever you’re going, pick up whatever cheap-o paring knife is there, and with the packaging it came in, make a small sheath and tuck it in. I’d rather have that than nothing!
MOLLE/PALS Webbing
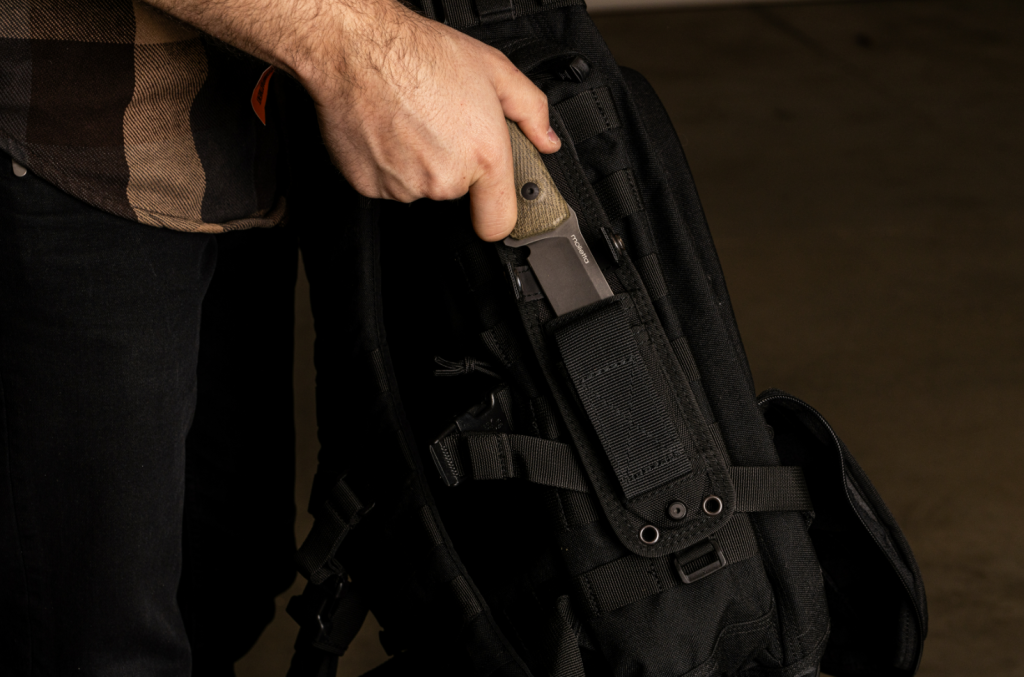
This is the most tactical of all the carry styles, especially if you use a vest. Many sheaths come with some method of attachment to webbing, allowing you to carry your knife on a pack or vest in just about any orientation. Everyone’s setup is unique, and this carry style allows you to use whatever works for you. Tactical indeed!
Why carry a fixed blade?
Fixed blade knives are the pinnacle of blade strength. I always want my tool to be something I can count on, and fixed blades are the most trustworthy of any knives. Yes, they are a bit more challenging to carry, but when you figure out a system that works for you, you will enjoy the benefits of strength and ergonomics without noticing the downsides. If folders are your jam, rock on! But if you’ve always wanted to carry a fixed blade, I hope you’ve found a method of carry that works for you!